Tutorial: Cyborg Girl Phone Theme
Ever looked somebody in the eye and thought: why aren't you my cyborg phone theme? Well wonder no more as this tutorial will explain step-by-step how to turn any face into an animated cyborg phone theme you can gawk at the rest of your days.
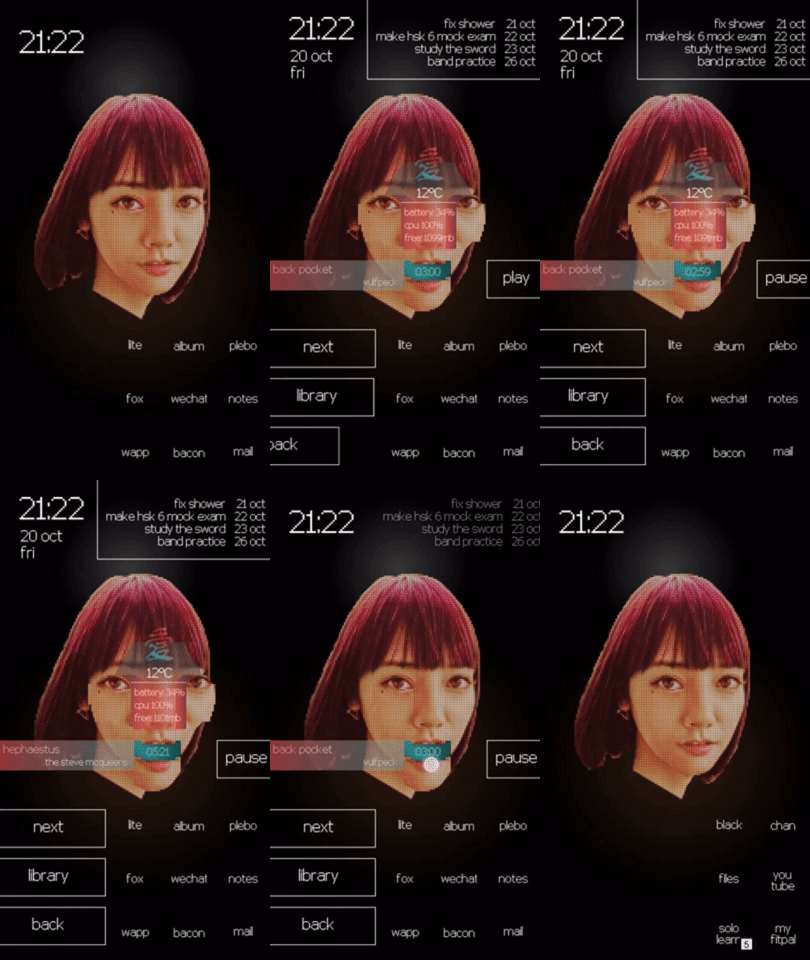
In short, this tutorial will create a phone theme that looks like a normal head at first glance, but upon pressing different parts of the head, will spawn a variety of animations and menus of your choice.
This tutorial requires the following:
- An Android phone.
- The KLWP app. The paid version isn't necessary but will allow to share your phone theme;
- A custom launcher like Nova Launcher.
- A nice icon pack or an app to make your own icon.
- An image manipulation program and some basic very knowledge on how to use it. I personally use the free program GIMP. Of course Photoshop will also do.
- A lovely photo of any person with the face clearly visible.
A free example KLWP file of the GIF shown above can be found HERE. Also check out this previous theme I made using the steps of this tutorial for another example.
For this tutorial I chose one of my favorite Japanese actors Rei Mizuna as my source image (please don't look her up if you're at work). Of course a friend, family, your SO, or any random person will do fine as well.
The above photo has a clear shot of the face and good lighting. The resolution is also nice but not very important if you want to pixelate the photo later.
First open your image manipulation program of choice. Like mentioned earlier I use the free program GIMP. This program gives me the tools to do things like cut, layer, and filter images.
After opening your program, open a blank canvas the size of your phone. This is usually 1080x1920 pixels. Next load your source image onto the canvas and resize it so the head is the appropriate size for you phone screen. This can be a matter of taste, but try to leave space for your phone icons and the menus that will be added later.
Cut out the parts of the source image you aren't going to use. This usually leaves the head. Because Rei was tilting her head in the source image, I tilted it straight again and centered her to roughly the middle of my canvas. Afterwards I used the eraser tool to smooth out rough edges.
If you did it right, you'll have a canvas with two layers: the head from the source image and background (can be any one color).
Now that you have the edited source image in your image manipulation program, you have the option to create a nice visual style. This can be done by using filters, more editing tools, or even drawing some additions. By the end of this step, you will have the non-animated version of the head.
The image manipulation program you are using probably has some nice filters and effects. If none of them are to your liking, luckily for you the internet and the google play store is littered with websites and apps that can make you image look cool. I personally export the edited source image to my phone and use the following two (partially free) android apps:
Above is the result I got after using both Prisma and 8bit Photo Lab. A simple method to keep only the head of the image I just loaded in (and not background that got edited as well), is to first select the layer containing the unaltered head, use the select tool to completely select said head, change back to the layer with the altered head (the selection will still be in the same place contouring the head), and cut the altered head to a new layer.
To tackle rough edges, you can use the eraser tool to smooth out any incomplete "pixels". Also feel free to use any additional tools for things like darkening/brightening areas for effect or changing the overall contrast/brightness.
If that worked you will now have three layers: a background, the source image head, and the altered image head.
Now we will be thinking about how to split the head into different parts. These parts will later be animated. It's important to understand that the way I split the head in my example might not be the most suitable way for the image you are using. You can look at the other theme I made I mentioned earlier for another way of splitting a head.
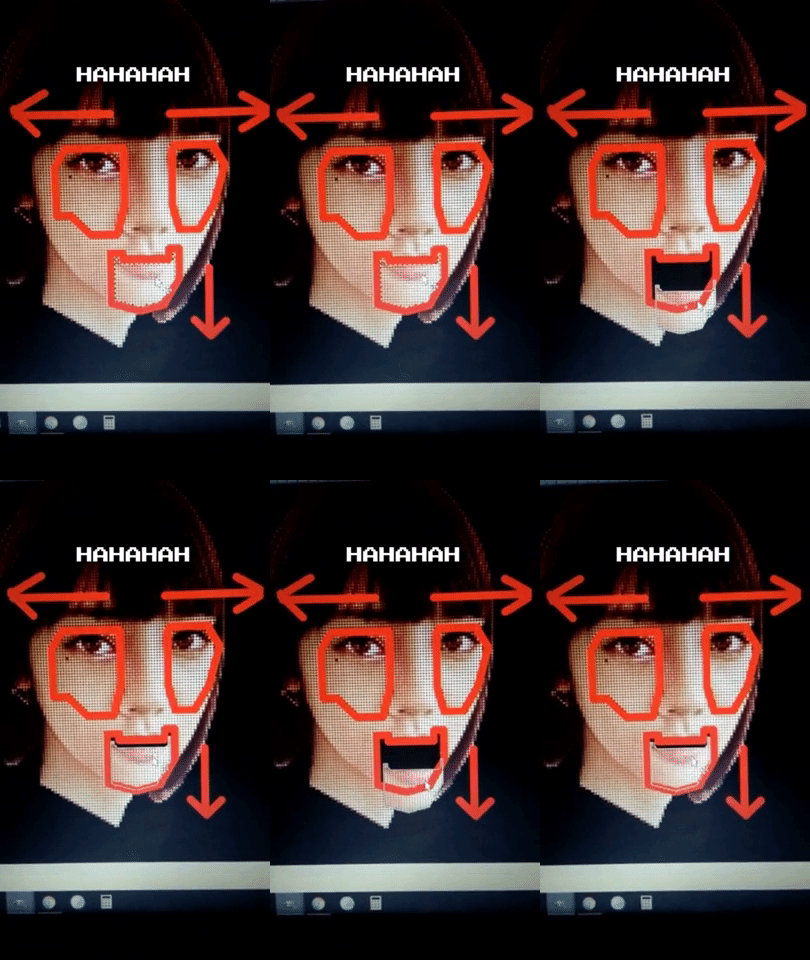
The way to plan splitting these different parts and how to animate them is using help lines. Create a new layer and select a brush tool with a noticeable color like red. Use the brush to split of the head in different parts and keep in mind the way you are going to animate these parts later. You could even add some arrows to make things clear for yourself.

You can try and make different versions of these helplines in different layers. Don't spend a lot of time getting these lines exactly right as they only serve the purpose of giving an example.
Step 1: Choosing the right photo as the source image
 |
| Japanese Actress Rei Mizuna |
Step 2: Creating a base from the source image
After opening your program, open a blank canvas the size of your phone. This is usually 1080x1920 pixels. Next load your source image onto the canvas and resize it so the head is the appropriate size for you phone screen. This can be a matter of taste, but try to leave space for your phone icons and the menus that will be added later.
Cut out the parts of the source image you aren't going to use. This usually leaves the head. Because Rei was tilting her head in the source image, I tilted it straight again and centered her to roughly the middle of my canvas. Afterwards I used the eraser tool to smooth out rough edges.
If you did it right, you'll have a canvas with two layers: the head from the source image and background (can be any one color).
Step 3: Change the style of the source image
The image manipulation program you are using probably has some nice filters and effects. If none of them are to your liking, luckily for you the internet and the google play store is littered with websites and apps that can make you image look cool. I personally export the edited source image to my phone and use the following two (partially free) android apps:
- Prisma. Uses some cool algorithms I don't understand to instantly turn any image into many fun visual styles. Just try out a bunch of filters and pick out the one you like the best (I picked a filter called "Illegal Beauty".
- 8Bit Photo Lab (I use the pro version for extra options). Turns your photo's into pixelated versions. Also contains cool filters. It can be a bit difficult to get a nice result out of this app because you can screw up the almost infinite settings. Some tips for this app:
- Start the app with the preset "B&W". It should pixelate your image a bit.
- Choose a color filter (forgot which one I used but I think it was somewhere on the far right).
- Choose a resolution (higher ones are only available in the pro version).
- Choose patterns. There are two tabs for this, one that looks like a checkerboard and the other one looks like a smiley face. In these menu's I chose Standard Pattern 4x4 in the first menu, and circles in the second.
- Mess around with the brightness, contrast, and saturation a bit to get what you want.
After you modified your source image enough, load it back into a new layer in your image modification program.
To tackle rough edges, you can use the eraser tool to smooth out any incomplete "pixels". Also feel free to use any additional tools for things like darkening/brightening areas for effect or changing the overall contrast/brightness.
If that worked you will now have three layers: a background, the source image head, and the altered image head.
Step 4: Splitting the head into different layers
The way to plan splitting these different parts and how to animate them is using help lines. Create a new layer and select a brush tool with a noticeable color like red. Use the brush to split of the head in different parts and keep in mind the way you are going to animate these parts later. You could even add some arrows to make things clear for yourself.

As a way of visualizing the animations for yourself, you can also use the helplines to manually "act out" animations like in the GIF above. You can do this using a similar trick used earlier:
- Choose the layer that contains helplines.
- Use the select tool to select the area you want to animate.
- Switch to the layer containing the altered image head.
- Cut out the selection and paste it again.
- Move the pasted selection around manually with the move tool to get an idea of how you want the selection to be animated.
Keep in mind that the above steps might differ if you use another program than GIMP.
When you have decided how to divide and animate the different parts of the head using the helplines, its time to start making the actual cuts. First make a backup layer of the altered image head so you can always go back when you screw up.
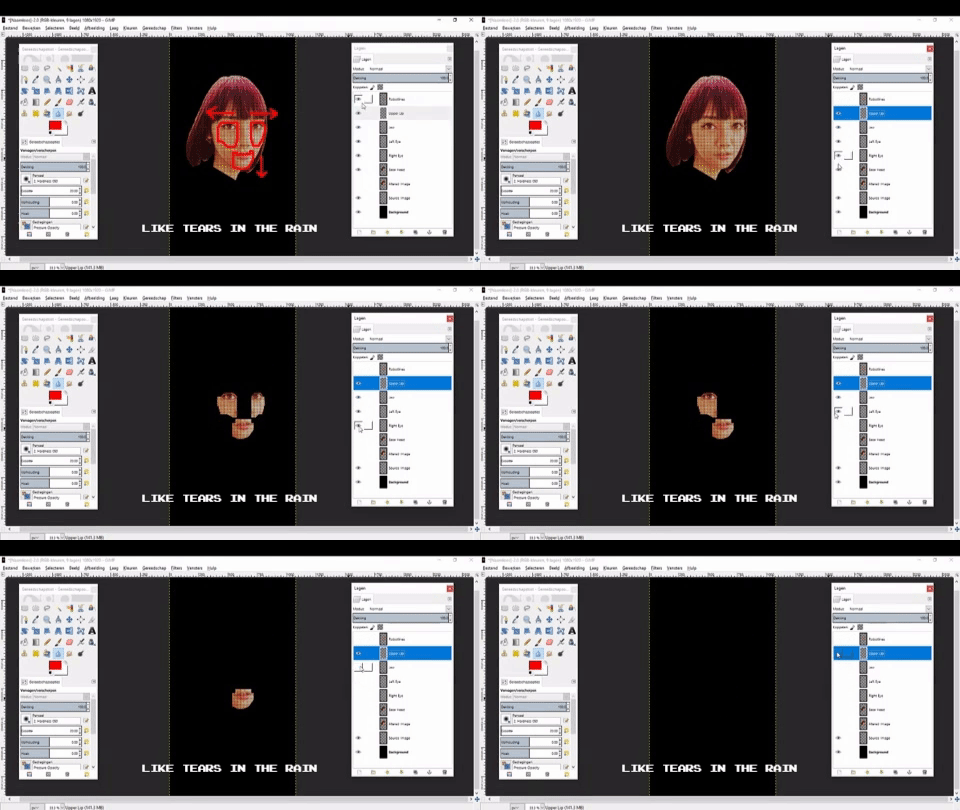
Each part of the head should be pasted into a separate layer. Because I pixelated the head, its pretty easy to make the cuts by cutting along the "pixels".
Cutting everything into different parts will probably take some time. If you are finished with this step you will have a background, the source image head, the altered image head backup, and different parts of the head in each their own layer.
Step 5: Exporting the head to your phone and inside KLWP;
The first part exported is what I call the base image. This will include the background layer and the parts of the head that won't animate and go "behind" every other layer in KLWP.
 |
| Base image |
On the left side is said base image. I excluded the lip part I made earlier because I planned it to go over another part.
After the base image I will export the other parts that will be animated. In my case this means the left and right eyes, the jaw, and the upper lip. See the right side for an example of a part that I exported and will animate later.
The following two things are important when exporting the other parts:
- Keep the resolution the same as the base image. This ensures the part will fit over the base image perfectly
- The background should be transparent. You do this by only turning on the layer you want to export. In GIMP this also means adding an alpha channel to the layer which is a fancy word for transparent background.
After exporting all the necessary parts and having access to them on your phone, its time to finally load all parts to the KLWP app. If you are not familiar with KLWP, it is an app which allows you to make your own phone themes using a WYSIWYG (What You See Is What You Get) interface. You make your theme using stuff like images, texts, shapes, and animations to create music players, agenda's, news feeds and many others things inside a phone wallpaper. There are tons of possibilities. Fair warning however: you can only export your themes using the paid pro version of the app. Also you need a custom launcher to run the theme (these are usually free, I use Nova Launcher).
So open KLWP and start a new file (load preset>upper right icon of a document). You'll see a preview of your theme (which is still empty at this point), some tabs below, and a couple of buttons sprinkled across the screen.
Short explanation of the buttons and tabs for beginners (also check this site for useful documentation):
- When on the "Items" tab, add items with the upper right "+" button. You will have the choice of adding images, shapes, texts, etc, but also group containers that can contain these items for things like stacking and animation purposes.
- The tab "Items" will show you the items you added. You can copy, delete, and change the name of items by checking its box on the right side and using the upper right buttons. Open an item by pressing it; here you will determine the characteristics of the item using item specific tabs (choosing an image/shape/text, position, which animation, what will happen when I touch it).
- The tab "Globals" contains values your items can interact with. In this tutorial I will use this tab to create two switches that will facilitate the animations.
Loading the exported parts is quite easy:
- Have the "Items" tab open and click on the upper right "+" button and choose "Image". The "Items" tab will show the image item you just added. Check its box on the right and use the upper right pencil icon to change its name to "Base Image"
- Open the "Base Image" item by clicking on it, new tabs will show. In the tab "Bitmap" click on "Pick Image". It will now give you the option to select the base image on your phone.
- After finding the base image and selecting it, it will show itself on the preview screen. It will probably be in a really small size so use the "width" buttons to scale the image up so it fits your screen nicely. It doesn't have to fit perfectly, just at a position where you think it looks good. You can also use the buttons in the "Position" tab to fine tune the position of the head.
- Go back to the "Items" tab by pressing the upper left button or your phone's return button. Check the box of the base image item again and click on the upper right copy button (the icon with two documents).
- Now press the upper right paste button (the icon with a clipboard) as many times as you have exported head parts left. The items tab should now be filled with multiple items called "Base Item. Except for most upper item, change the names of the times to names describing the other head parts (left eye, right eye, jaw, etc)
- Open the items you just changed the name of and load in the exported part based on the name of the item. Loading these images works like step 2.
- Press the save icon (it might ask you if you want to set KLWP as your standard wallpaper) and go to your phones home screen to see your result. On some phones the preview menu in KLWP doesn't perfectly match the actual result on your phone screen so always do a final check on your theme outside the app when adjusting your theme.
If you followed the above steps, you would have the different exported parts of the head as different items in KLWP. You can change the order of the items if necessary but the base image item should probably be at the top making it the item furthest in the back.
Step 6: Animating different exported parts
Having all parts of the head in place, we can now start animating them. In my example each part of the head goes into different directions but the type of animation of each part is roughly the same: it scrolls from one position to another.
In the end the animations will start when pressing a certain part of the head. What you are actually pressing are invisible buttons. When pressed, these buttons will turn on and off certain switches. The animations will in turn react on these switches.
Switches and Buttons
To keep it simple we will first create the switches and the buttons
- Go to the "Globals" tab and press the upper right "+" button. A menu will pop up asking for a name and type. Because my first animated sequence (a set of animation triggered by a single action like a switch) is centralized around the jaw, I called my first switch "jaw" with the type "On/Off Switch". Press OK. I then make a second "On/Off Switch" called "face" for the second animation sequence.
- Go to the "Items" tab and add 2 shapes using the "+" button. I will call the first button "Music Menu Button" because it will open up my music menu. The second button I will call "Main Menu Button" because it will open the other menus containing info like the weather, agenda, date, and some system information like my battery status.
- Open a button by clicking on it in the items tab. Set the shape to rectangle, change the shape using the width and height buttons. Now go to the "Paint" tab and set style to "Stroke" so the shape is just an outline with the inside unfilled (we will make the button invisible later). Finally use the "Position" tab to place the button over the part of the face you want to be clickable. Make sure to make the buttons big so that it will be easy to activate the menus later on.
- While still in the menu of the button, go to the "Touch" tab and add a touch command. Choose "Toggle Global Switch" as your action and one of your switches you made in step 1 as your "Switch" (I use the switch "jaw" for the "Music Menu Button"). Press the upper right button to save the touch command.
- Perform steps 3 and 4 for the second button or any other animation triggering buttons you might have.
If you performed the steps correctly, you will have different buttons that change switches when touched. Now we will have to make certain animations react to these switches.
Animations
For the animations I will start with the "Jaw" item
1. Open the item you want to animate in the "Items" tab. Go to the "Animations" tab and press the "+" button. An animation entry will be placed in the tab. Click on it, set "ReactOn" on "Global Switch". I set my global to "Jaw" because I am animating the "Jaw" item. I want it to scroll so I set the animation to scroll.
1. Open the item you want to animate in the "Items" tab. Go to the "Animations" tab and press the "+" button. An animation entry will be placed in the tab. Click on it, set "ReactOn" on "Global Switch". I set my global to "Jaw" because I am animating the "Jaw" item. I want it to scroll so I set the animation to scroll.
The scroll animation has different parameters which are a bit tricky to understand at first:
- Ease, adds cool effects to the scroll animation, like making it bounce. Also a way to inverse an animation (starting position and ending position are switched)
- Duration, how long the animation will take to go from one point to another.
- Speed, if the "Limit" parameter isn't set (which usually is the case), the speed parameter determines how far the item will scroll till it stops.
- Angle, which direction the item will scroll. 0 = right, 90=down, 180=left, 270=up
- Limit, sets a limit to how far the item will scroll till it stops. I usually keep this on 0.
I have the following settings respectively for the "Jaw" item:
(Bounce, 3, 5, 180,0,0)
2. After setting all the parameters you can click the upper right button for a preview of the animation, press the preview screen, or just save your theme and test it on your actual home screen.
3. Repeat step 1 and 2 with the other items you want to animate. Check my example file if you want to know how I set the other head animations.
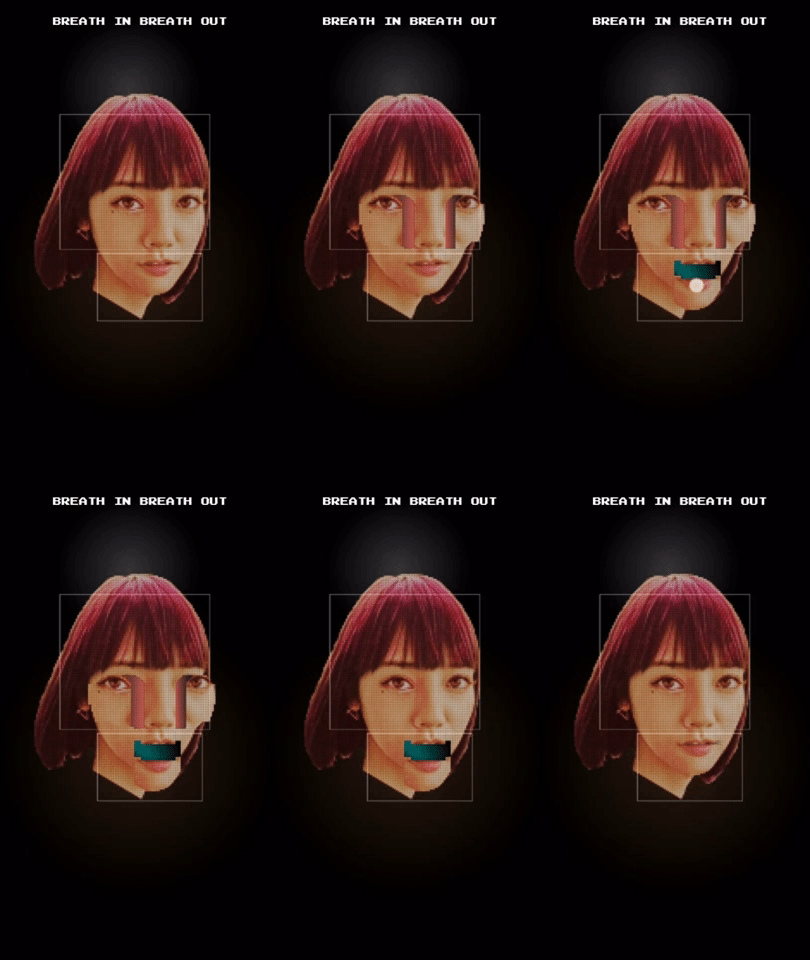
After setting the switches, buttons, and animations, you might have something like the GIF above. If the result is not the way you expected it to be, don't hesitate to go back to step 4 till you get exactly what you want. I do this a couple of times as well when making any theme. A good thing however is that now you have the knowledge the create the other non-head animations quite easily.
Step 7: Other menus
Using the functions learned in step 5 and 6, I will shortly explain which components make up which menu and how they work. For in-depth info just open the example project. Mess around with the settings in KLWP to get the result you want. I listed some finishing touches I made to the theme at the end as well.
The menu containing the song and artist info, the time left in a song, as well as buttons for controlling and opening your music player.
- Consists of various music player buttons. Each button is an "Overlap Group" with a shape and a line of text. See this page again for more info on "Overlap Groups". Buttons scroll with different animation "Duration" and "Delay" parameters.
- The above point counts for the music info display as well: an overlap group with a shape (can also be an image) and some text. When writing in a text field you have the option to display various information using simple functions and formulas. Check this page for more info on functions and formulas. Uses the animation "Scale Out Horizontal" and a looping "Color Filter In" to make it flash.
- The tab "Touch" will determine what command to send to you music player (don't forget to choose the right music player in your KLWP settings).
- Animations react to the "jaw" switch.
System Information Menu
The menu containing weather info, as well as phone information such as you battery percentage, CPU, and free space left on your memory. I didn't put everything in a "Overlap Group" because getting each item inside the group in the right positions can be a hassle.
- Has a hexagon shape with a horizontal gradient. Scale in/out vertically animation. Also a looping "Color Filter In" animation for the same flashing effect as the music info display.
- A line of text showing the current temperature. Scale in/out animation.
- A stack group containing text items with system information. Scale in/out animation.
- A cool Chinese/Japanese character I made using a Chinese caligraphy website, running it through 8bit Photo Lab, and adding colors using GIMP's color gradient tool. Fade in/out animation and slight scroll up animation
- A horizontal line horizontally scaling in and out.
- Animations react to the "face" switch.
Date and Agenda Menu
The menu containing date and time info, as well as your agenda items
- Has a text item containing the time. Scroll animation
- A text item containing date and day of the week. Scroll animation.
- Two rectangle shapes made into lines with scrolling animations.
- An overlap group containing two stack groups containing text items showing your agenda items. Getting the formulas and position for these text items might be tricky, make sure to check the example file for some clarification. Fade in/out and scrolling animation
- Animations react to the "face" switch.
Finishing touches
Below some things I added at the end when I was finished with all the menus and animations.
- Make the buttons triggering the animations invisible by choosing a color with full transparency.
- Added color to black spaces left behind by the moving face parts. Did this by deselecting the animated parts in gimp, and adding a red color gradient to the space left by the mouth and a blue one to the space left by the eyes. Then ran these new elements through 8bit Photo Lab to match the rest of the face. This requires re-exporting the base image.
- Added two circle color gradients above the head (white) and below head (orange)
- Changed my app icons to words with the same font used in KLWP (Pixel FJVerdana12pt). Did this with the Simple Text app. The font should be placed in the designated font map inside KLWP as well before you can use it.
- Used the "Wipe" screen scrolling effect in Nova Launcher so the icons won't scroll through the music menu buttons.
End result
After following the steps of this tutorial you will have a nice phone theme made of an animated head of your choice. Perhaps you also gained some knowledge on using image manipulations programs such as GIMP, and know a bit more about using KLWP. I also hope you had some fun.
If you have any questions or request, feel free to leave a comment below or contact me on my Reddit account Davidc4ke.





Hey, Nice theme. Even though you explained everything clearly, I still keep screwing up. Is there any way, you could make a video of this?
BeantwoordenVerwijderen